
Can you handle it? Restraint for nail trimming.

We are four weeks into our cooperative care nail trimming blog series, and that much closer to actually clipping some claws; but before we can do that, we need to get our dog comfortable with the handling and restraint involved in a nail trim.
I encourage you to train and utilize a “start button” or “stationing” behavior when doing nail trimming, however, we are still going to have to manipulate the dog’s paw to get the best vantage point and angle at which to trim the nail, so handling is something that cannot be avoided.
As with everything involved with cooperative care, we need to find a starting point where our dog is comfortable with the handling we are doing.
“Comfortable” is not a dog who simply “tolerates” what is being done to them, rather a dog who is consenting and actively participating.
Our start button behavior allows the dog to clearly communicate their willingness to participate with us (or not.) My dog’s starting point with body handling might look very different from your dogs, and that’s OK! These training plans are not “one size fits all” and will require some adjustments, and even added steps, for many of our dogs.
The training plan introduced today is going to look very similar to the one we went through last week involving the nail clippers, but we are going to be using our hands.
I am only going to start my handling repetition when my dog has given his consent – for my dog, this looks like lying his head down on the floor while lying on his side. Once consent is given, we will get to work. I would recommend repeating each step of the training plan for a minimum of 5 successful repetitions in a row (successful being a repetition where your dog does not pull away or leave their start button position).
Introducing your hand – I want to get my dog comfortable with the idea that my hand can move while he is in his start button position, without him having to move also. Often, a raised hand in training sessions indicate food is coming, and our dog might orient to that hand in hopes of getting a treat.
In this initial step, I am going to move my hand slightly (raising it up in front of me, or even just lifting it out of my lap if my dog needs a smaller motion) and reward him for remaining in his start button position. Should he lift his head (this is highly likely while the dog gets the hang of the game), this tells me to “stop” and I need to withdraw my hand immediately. I need to respect the rules of consent I have taught my dog, even if I suspect his movement is out of curiosity (or to mooch for food!)Reaching for the dog – once my dog is comfortable remaining in his start button position while my hand moves, I am going to make my movement more obvious, and reach towards my dog. To start, my hand will reach over my dog at a distance away from, simply to get him comfortable with the idea of my hand moving towards him.
Reach closer – as my dog is comfortable with my hand reaching over top of him (at the front and back end, let’s not forget that the dog has hind legs too!) I am going to start to reduce the distance between my reach and his body – but I’m not touching him quite yet!
Touching a neutral body part – just like with the nail clippers, I don’t want to go straight for my dog’s paws, as this can startle them. Instead, my initial touches are going to be to “neutral” body parts, such as the shoulder or the hind end. I find that most folks want to do a feather light touch, almost so the dog doesn’t realize they’re touching them – I wouldn’t recommend this. In my experience, a light touch can be more startling to the dog than a more obvious one; it almost makes me wonder if those light touches are ticklish to the dogs. Your initial touches are going to be one second in duration.
Touch longer – now that your dog is comfortable with you reaching and touching them in a neutral location, we are going to extend the duration of the touch from one to three seconds.
Working your way down the leg – now it’s time to gradually move our touch down the dog’s leg towards the target area, their paw/nails. I look to use what is called a touch gradient for this.
A touch gradient is where you maintain hands on contact and utilize a guiding touch as you work your way towards different parts of the dog’s body. For example, if I want to touch my dog’s front paw, I will place my hand first on his shoulder and gently slide it down his forearm, and to the paw, maintaining physical contact throughout.
This step will involve multiple sub-steps as you work your way down the leg one section at a time; elbow, forearm, wrist, and eventually down to the paw. The paw is where most dogs seem to be sensitive to, so you may find that you need to add in some “micro steps” along the way as you get closer to the target area. Ensure that your dog is happy and successful with each area before moving on (my goal is for five successful repetitions in a row where the dog is not pulling away or withdrawing consent.)Hold your hand – once we are able to touch the dog’s paw for 3 seconds, we’re going to increase this contact to “holding” the dog’s paw gently.
Wrap your fingers around the dog’s paw, without lifting it too off of the ground too much, for one second to start, and then increasing to three seconds of duration as the dog is comfortable.Manipulate the nail – now that we can hold the dog’s paw, we need to start to introduce them to the manipulation required to expose the nail to us so we can clip it. If you have a dog with fluffy paws, this step is might take longer, as you are going to have to sort out their toe hairs in order to appropriately visualize the nail.
I like to start my manipulation by gently pressing on the dog’s toe pad, which will help “push” the nail/toe forward more, making it easier to see where I want to clip.
I will then graduate to using my thumb to pull the hairs back away from the base of the nail, so that I can visualize it better, and increase my manipulation as needed, until I can manipulate the nail as I would need to in order to clip it (but we’re not doing that just yet!)
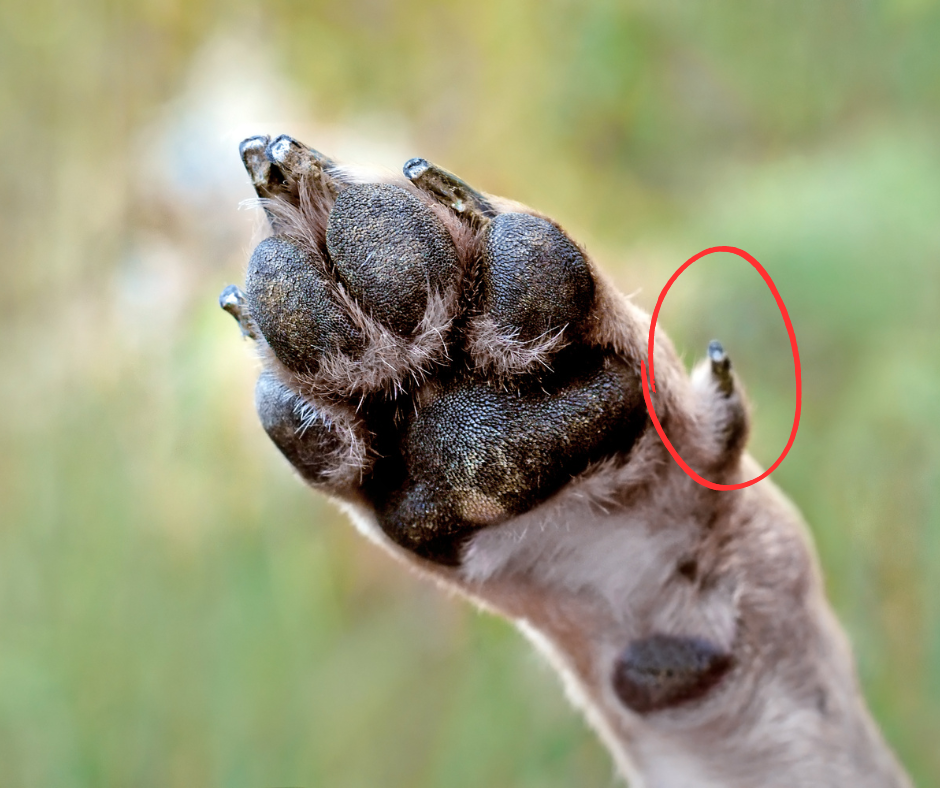
The dog’s dewclaw can be seen circled in red. Some dogs will have more than one dewclaw on each paw!
With any nail care and handling, it’s important that you spend time with all the nails on each paw.
Some dogs will be more sensitive to the front nails being touched vs. the back, whereas others may dislike all their paws being handled.
While you’re at it, don’t forget about the dewclaws, or the dog’s “thumbs” that are located slightly higher up on the inside of the leg (not all dogs have these, so don’t panic if your dog’s thumbs are missing!)
If you want to see the steps of this training plan in action, be sure to follow me on Instagram, where I will be posting a video demonstration later on this week.
Next week, I am going to be showing you how to combine today’s restraint with last week’s nail clippers, putting us one step closer to performing a pedicure. Stay tuned for the rest of this cooperative nail trimming series!
Stay awesome.
Vanessa
Follow me on Instagram for more dog training education, training, and other content!
Vanessa Charbonneau, is the author of Dog Care for Puppies: A guide to Feeding, Playing, Grooming and Behavior. She owns Sit Pretty Behavior & Training, employing force-free training techniques, and specializing in working with fearful, aggressive, and reactive dogs. Charbonneau lives in Prince George, BC with her husband, two daughters, and one dog.