
Clipping your dog's nails cooperatively; the finale.
We are on week five of the cooperative nail trimming blog series, and it is time. That’s right - if you’ve being following along with each week’s training plans, working at your dog’s pace, and ensuring their consent and comfortability along the way, you should almost ready to clip a nail!
We have addressed our dog’s comfort with the nail clippers as well as paw handling separately, so now we need to combine the two together. Here are a couple of training reminders before we begin:
your dog should be happy and willing every step of the way. The easiest way to gauge your dog’s comfort level is by teaching them a “start button” behavior that they can use to communicate their consent.
If your dog moves out of their start button position, you need to automatically stop/withdraw your hands. No if’s, and’s, or but’s around this rule folks. If we want our dog to trust us, we need to follow the rules and respect their “no.”
keep your training sessions short and sweet - no longer than 5 minutes. My preferred session length is around three minutes, but if nail trimming is challenging for your dog, I would recommend shortening this to 1-2 minutes, tops.
make sure you are using high value reinforcers. Your dog is working hard, so make sure you are compensating them appropriately.
If you are using a marker signal, such as a clicker, or a verbal word (either of which I would strongly encourage), make sure you follow your marker with a reward every time.
I would encourage you to repeat each training step a minimum of 5 successful repetitions in a row. To me, a successful repetition is one where my dog does not remove his consent, nor does he show signs of stress.
Let’s take a look at today’s training steps:
Touch and present the clippers - as we are making the task harder for the dog (two hands vs. one), we are going to go back to touching a neutral body part, like the shoulder, again, to ensure we are setting our dog up to be successful. Touch their shoulder with one hand, and then present the nail clippers with the other.
Note: we are not reaching the clippers towards the dog, nor are we touching the clippers to them just yet. Right now, we just want the dog to get comfortable with the idea that both hands being involved is safe.Reaching out the clippers - building on step one, we are going to touch the dog’s shoulder and are going to reach our nail clippers out over the dog simultaneously. As the dog is comfortable with this, you can reduce the distance between your clippers and the dog’s body gradually.
Touching with the clippers - your dog should now be ready to have your hand AND the nail clippers touch them on a neutral body part (shoulder or hip). Keep this touch short to start (one second) and only increase the duration of the contact as they are ready.
Work your way down the leg - utilizing our touch gradient that we introduced last week, you are going to work your way down the dog’s leg one section at a time, moving both your hand and the clippers, until you reach their paw. I like to start at the shoulder, moving to the elbow, then the forearm, to the ankle, and then down to the paw.
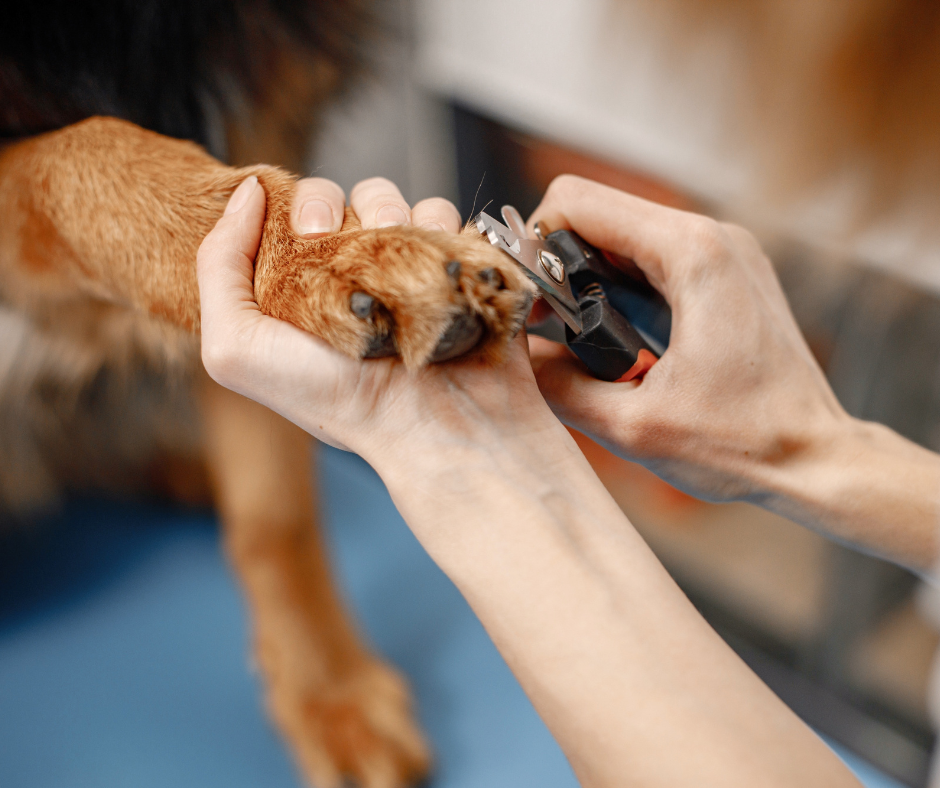
Clippers, meet nails - you should now be able to hold your dog’s paw and touch the clippers to it. We are going to challenge the dog further by touching the nail clippers to the nail while we continue to hold their paw.
Once this is going well (remember, five repetitions or more), we are going to open the clippers and practice “hooking” them over the nail. This step can be a tricky one for the dog, as it feels and looks a lot like the “real deal” - but we’re not clipping yet! We need to make sure the dog is comfortable with the sensation and the handling involved with positioning the clippers on the nail. Take your time here!Clip a claw - you should now be ready to attempt clipping a nail. I would encourage you to start small and not clip too much to start. Aim to only clip one nail per session right now, and jackpot reward your dog after the clipping is done (effusive praise, and several treats in a row!) If your dog is game to re-join the training session after the clip, I would finish off by performing some “easy” repetitions of reaching for or touching the leg, but no more clipping today. Congratulations! You just clipped a nail with your dog’s consent!
This training plan is not “one size fits all” and lots of dogs will need some adjustment to the training steps, or how much time is spent at each step - this is OK! Training is an individual journey and will be unique to each dog and guardian. The main thing is that you are working at your dog’s pace, ensuring that you set them up for success every step of way.
POTENTIAL “SPEED BUMPS” YOU MIGHT ENCOUNTER ALONG THE WAY:
Q: My dog is afraid of the “clip’ sound. What should I do?
A: This is an issue we see in many dogs. I like to pair the potentially “scary” clipping noise with a treat party for my dog, to create a positive association with the sound. We can emulate the clipping nose by clipping a matchstick or uncooked spaghetti noodle, following the sound with a treat party (cheering, praise, and feeding 3-5 high value treats in a row.) Repeat this process (“Clip” > Treat Party) until your dog starts to look excited when they hear the clipping sound.
Q: What do I do if my dog needs a nail trim, but isn’t ready?
The nail trimming process can be tedious to start, especially if your dog has had multiple negative experiences with trimming already. You might end up in a situation where your dog’s nails are in desperate need of a trim, but you are not far enough in your training plan to do so stress-free. In this case, I might recommend teaching your dog to use a scratch board to shorten their nails, as you can do this without any handling or restraint. While this option is the least invasive, it will require a lot of scratches before you start to see any reduction in the length.
You may also have to speak with your veterinarian about performing a sedated nail trim in order to get some length off of those claws. The sedation can reduce your dog’s stress (and memory) of the event which can reduce your dog’s stress levels, and protect your training progress.
Q: How do I know when my dog is really ready to have a nail clipped?
I’m looking at a few things before I decide if the dog for me to clip one of their nails:
The dog is regularly and enthusiastically consenting to training sessions. Nail trimming sessions should be FUN for your dog, so look for a dog who is eager to play.
Minimal withdrawal of consent. Your dog is going to say “no” from time to time, for various reasons, but it should be few and far between. If your dog is withdrawing their consent by moving out of their start button behavior frequently, this tells me that the dog is not ready for clipping. You might need to go back a step or two in your training plan to find a spot where your dog is entirely comfortable.
Minimal tension or pulling away - our dog might tense up their leg without moving out of their start button position, which can be confusing. I’m inclined to air on the side of caution and interpret tension in the leg or pulling the leg away as a “no” from my dog. If your dog remains tense (even if they’re still consenting to the handling), I would step back and build more confidence with the handling exercises first.
Q: What are some signs that my dog is NOT ready for me to clip a nail?
the dog is pulling their paw away or is “tense” during handling,
your dog is telling you “no” or withdrawing consent regularly,
the dog is hesitant to join or continue in a training session,
your dog is showing signs of fear/stress - lip licking, whale eyes, ears back, tense limbs, shaking, tail tucked, avoiding you/the clippers, etc.
you need a second person to restrain the dog - if we’ve done our training properly, restraint should only be required to manipulate the dog’s paw so you can see the nail properly. If you think you need a helper, your dog likely isn’t ready for clipping.
Q: How often should I trim my dog’s nails?
A: This depends on the dog, how much they wear down their nails, and how fast their nails grow. If your dog hasn’t had their nails trimmed in a while during training, you likely won’t be able to cut them back too far initially. The nail’s blood supply will “grow out” with the nail, which will inhibit how far back you can cut without reaching the blood supply. If this is the case, I would recommend frequent nail trims, every one to two weeks, so you can push that blood supply back further and shorten up those nails to a healthy length.
When we first start clipping, we will only be clipping a single nail per session, so you’re likely going to want to train daily in order to get all the nails trimmed. As your dog’s comfort increases, you should be able to trim more nails per session, and can reduce how frequently you train (or not, up to you!) Personally, I trim my own dog’s nails every 1-2 weeks to keep them at a nice, healthy length - and to keep up on our training!
That wraps up the cooperative nail trimming blog series! I hope you’ve found this information valuable to you, and would love to hear how your training is going with your dog.
If you want to see the steps of this training plan in action, be sure to follow me on Instagram, where I will be posting a video demonstration later on this week.
Thank you for following along, and Happy Hoidays!
Vanessa
Follow me on Instagram for more dog training education, training, and other content!
Vanessa Charbonneau, is the author of Dog Care for Puppies: A guide to Feeding, Playing, Grooming and Behavior. She owns Sit Pretty Behavior & Training, employing force-free training techniques, and specializing in working with fearful, aggressive, and reactive dogs. Charbonneau lives in Prince George, BC with her husband, two daughters, and one dog.